
PyTorch는 머신 러닝과 딥 러닝을 위한 오픈 소스 프레임워크이다.
What is tensor?
https://tutorials.pytorch.kr/beginner/basics/tensorqs_tutorial.html
텐서(Tensor)
파이토치(PyTorch) 기본 익히기|| 빠른 시작|| 텐서(Tensor)|| Dataset과 Dataloader|| 변형(Transform)|| 신경망 모델 구성하기|| Autograd|| 최적화(Optimization)|| 모델 저장하고 불러오기 텐서(tensor)는 배열(array)이
tutorials.pytorch.kr
PyTorch의 Tensor는 다차원 배열을 표현하는 기본 데이터 구조이다. NumPy의 배열과 유사하다.
1. Tensor로 0차원 배열 표현하기
#0차원 배열
a = torch.tensor(36)

#출력값 a =  tensor(36)
2. Tensor로 1차원 배열 (vector) 표현하기
# 1차원 tensor
# 1차원 vector

b = torch.tensor([175,30,9,12])

#출력값 b =  tensor([175,  30,   9,  12])
3. Tensor로 2차원 배열 (matrix) 표현하기
# 2차원 tensor
# 3 x 4 행렬

c = torch.tensor([[175,30,9,12],
                 [77, 114, 140, 191],
                 [17, 111, 114, 11]])

# 출력값 c =  tensor([[175,  30,   9,  12],
#        [ 77, 114, 140, 191],
#        [ 17, 111, 114,  11]])
4. Tensor로 3차원 배열 표현하기
# 3차원 Tensor
# 2x3x4 형태의 3차원 Tensor 생성


d = torch.tensor([
    [[1, 2, 3, 4],
     [5, 6, 7, 8],
     [9, 10, 11, 12]],

    [[13, 14, 15, 16],
     [17, 18, 19, 20],
     [21, 22, 23, 24]]
])

#출력값
# d = tensor([[[ 1,  2,  3,  4],
#         [ 5,  6,  7,  8],
#         [ 9, 10, 11, 12]],
#
#        [[13, 14, 15, 16],
#         [17, 18, 19, 20],
#         [21, 22, 23, 24]]])
Tensor의 데이터 타입
https://pytorch.org/docs/main/tensors.html
torch.Tensor — PyTorch main documentation
Shortcuts
pytorch.org
Tensor가 저장하는 값의 데이터 유형에는 무엇이 있을까?
(Tensor의 모든 원소의 Data type은 같다 => 연산의 효율을 높이고, 데이터의 일관성을 높이기 위해서)
Tensor는 uint8, int8, int16(short), int32(int), int64(long), float32(float), float64(double)등 다양한 데이터 유형을 지원한다.
#uint8

a = torch.tensor(1,dtype = torch.uint8)

#int8

b = torch.tensor(-1,dtype = torch.int8)

#short

c = torch.tensor(256,dtype = torch.short)

#int

d = torch.tensor(40000,dtype = torch.int)

#long

e = torch.tensor(2000000000,dtype = torch.long)

#float

f = torch.tensor(1,dtype = torch.float)

#double

g = torch.tensor(1,dtype = torch.double)
Tensor의 타입 캐스팅
# int형 타입을 double로 타입 캐스팅

i = torch.tensor([2, 3, 4], dtype = torch.int)
i = i.double()
print("i dtype :",i.dtype)

#출력값 i dtype : torch.float64
Tensor의 Method
#sum
tensor.sum()

#min, max
tensor.min()
tensor.max()

#mean, var, std
tensor.mean()
tensor.var()
tensor.std()
Tensor의 특성을 확인하는 Method
# tensor의 차원의 수를 확인
tensor.dim()

# tensor의 모양을 확인
tensor.size()
tensor.shape #(shape의 경우에는 Method가 아닌 속성이다)

# tensor의 요소의 총 개수 확인
tensor.numel()


### Numpy ###
# Numpy에서는 np.shape가 모양을 확인하고
# np.size가 요소의 총 개수를 확인한다.
# 헷갈리지 않도록 유의하자
# Tensor.numel() = np.size()
Tensor의 생성
https://pytorch.org/docs/stable/generated/torch.randn.html#torch.randn
torch.randn — PyTorch 2.4 documentation
Shortcuts
pytorch.org
0으로 초기화된 Tensor의 생성
# 0으로 초기화된 Tensor
a = torch.zeros(5)
a = torch.zeros([2,3])

print('a.dtype =', a.dtype)

a.dtype = torch.float32
# float형으로 초기화 된다.

# 1로 초기화된 Tensor
a = torch.ones([2,4])
a = torch.ones([2,4,6])

a.dtype = torch.float32
# float형으로 초기화 된다.

#특정한 Tensor을 0혹은 1로 초기화하기

a = torch.zeros_like(Tensor)
a = torch.ones_like(Tensor)
0, 1 사이의 연속균등분포와 표준정규분포에서 추출한 난수로 채워진 Tensor의 생성
# [0, 1]의 연속균등분포에서 추출한 난수로 채워진 Tensor
a = torch.rand(4)
b = torch.rand([3,4])

# 출력값
# a = tensor([0.4765, 0.5537, 0.1685, 0.2151])
# b = tensor([[0.4924, 0.0125, 0.1298, 0.8920],
#         [0.6239, 0.9564, 0.0620, 0.3326],
#         [0.2280, 0.5233, 0.9444, 0.3584]])

# [0, 1]의 연속균등분포에서 추출한 난수로 Tensor 변환하기

c = torch.rand_like(tensor)

# 표준정규분포에서 추출한 난수로 채워진 Tensor
a = torch.randn(4)
b = torch.randn([3,4])

# 출력값
# a = tensor([ 0.2871,  0.4660,  1.1191, -0.3111])
# b = tensor([[ 1.1400,  1.4602,  0.3568,  1.3110],
#         [ 1.4635,  0.3371,  1.0896,  0.1497],
#         [-0.0060, -1.2141, -1.5595, -0.7291]])

# [0, 1]의 연속균등분포에서 추출한 난수로 Tensor 변환하기

c = torch.randn_like(tensor)
지정된 범위에서 일정 간격을 가진 Tensor의 생성
#지정된 범위에서 일정 간격을 가진 Tensor의 생성

a = torch.arange(start = 0, end=10, step = 2)

# 출력값
# tensor([0, 2, 4, 6, 8])
# 10은 포함하지 않음.
# a.dtype = torch.int64

a = torch.arange(start = 0, end=10, step = 0.5)
# 출력값
# tensor([0.0000, 0.5000, 1.0000, 1.5000, 2.0000, 2.5000, 3.0000, 3.5000, 4.0000,
#        4.5000, 5.0000, 5.5000, 6.0000, 6.5000, 7.0000, 7.5000, 8.0000, 8.5000,
#        9.0000, 9.5000])
#
# a.dtype = torch.float32
# 정수는 long형으로 부동소수는 float로 변환된다.
초기화되지 않은 Tensor의 생성
# 초기화되지 않은 Tensor의 생성
a = torch.empty(5)

# 출력값
# tensor([ 2.1915e-19,  4.3408e-41, -8.6762e-14,  3.2926e-41,  0.0000e+00])

# tensor을 특정한 수로 채우기
a.fill_(10)

# 출력값
# tensor([10., 10., 10., 10., 10.])
empty함수를 사용하면
1. Tensor를 빠르게 생성이 가능하다.
2. 메모리 오버헤드를 감소시킬 수 있다.
3. 효율적인 리소스(연산, 메모) 사용
Numpy를 이용하여 Tensor 생성
# Numpy를 이용하여 Tensor 생성

a = torch.from_Numpy(np)
CPU Tensor 생성
#정수형 CPU Tensor 생성
a = torch.IntTensor([1,2,3,4,5])

#실수형 CPU Tensor 생성
a = torch.FloatTensor([1,2,3,4,5])
ByteTensor, DoubleTensro, Longtensor 등 다양한 type을 지원한다.
Tensor의 복제
# Tensor의 복제
y = x.clone()
z = x.detach()

# detach의 경우 clone과 달리 계산그래프에서 분리한다.
clone(): 데이터와 그래디언트 추적을 포함한 새로운 Tensor를 생성한다.
detach(): 데이터만 공유하며, 그래디언트 추적을 제외한 새로운 Tensor를 생성한다.
CUDA Tensor의 생성
# CUDA Tensor의 생성

a = torch.tensor([1,2,3,4,5]).cuda()
a = torch.tensor([1,2,3,4,5]).to('cuda')

# CUDA Tensor을 Cpu Tensor로 변환

a.cpu()
a.to(device ='cpu')
Tensor Indexing, Slicing
https://pytorch.org/cppdocs/notes/tensor_indexing.html
Tensor Indexing API — PyTorch main documentation
Tensor Indexing API Indexing a tensor in the PyTorch C++ API works very similar to the Python API. All index types such as None / ... / integer / boolean / slice / tensor are available in the C++ API, making translation from Python indexing code to C++ ver
pytorch.org
1차원 Tensor의 Indeing, Slicing
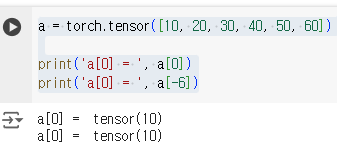
Index는 0부터 시작하며, 뒤쪽에서부터 순서를 셀때는 -1부터 시작한다
print('a[1:4] = ', a[1:4])
print('a[-5:-2] = ', a[-5:-2])

print('a[:4] = ', a[:4])
print('a[:-2] = ', a[:-2])

print('a[1:] = ', a[1:])
print('a[-5:] = ', a[-5:])


print('a[:] = ', a[0:])

print('a[::2] = ', a[::2])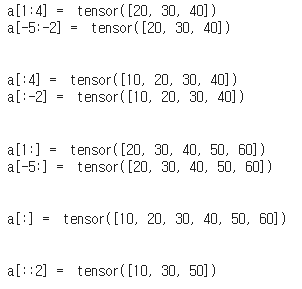
tensor[a:b:c] => a부터 b까지 c만큼의 stride로 subTensor를 생성한다.
2차원 Tensor의 Indeing, Slicing
b = torch.tensor([[10, 20, 30],
                  [40, 50, 60]])

print('b[1, 2] = ', b[1, 2])
print('b[-1, -1] = ', b[-1, -1])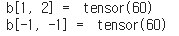
print('b[1, :] = ', b[1, :])
print('b[-1, :] = ', b[-1, :])

print('b[:, 1:] = ', b[:, 1:])
print('b[:, -2:] = ', b[:, -2:])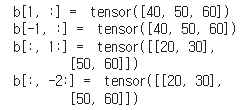
tensor[a:b:c,a:b:c] => ',' 를 사용하여 행과 열을 표현한다.
Slicing은 새로운 Tensor을 만드는것이 아닌 view를 만드는것이기 때문에 연속적이지 않을 수 있다.
Slicing을 한 Tensor을 변경하면 원본 값에도 영향을 미친다.
Tensor의 모양 변경
view() : Tensor의 메모리가 연속적으로 할당된 경우에만 사용이 가능하다
=> is_contiguous()로 연속성 판단.
a = torch.tensor([[10, 20, 30],
                  [40, 50, 60]])

print(a.is_contiguous())

b = a[:,1:]

print(b.is_contiguous())

b = b.contiguous()
print(b.is_contiguous())
연속적이지 않을경우 contiguous()함수로 연속적으로 만들어준다.
=> contiguous함수가 view였던 것을 새로운 Tensor을 생성하여 재배치한다.
=> 이 경우 reshape과 큰 차이가 없다.
view()
a = torch.arange(20)
print(a)
a.size()

a.view(4,5)
a.view(4,-1)
a.view(-1,5)

a.view(2,2,5)
a.view(-1,2,5)
a.view(2,-1,5)
a.view(2,2,-1)


flatten()
a = torch.randn(3,2)
print(a)

a_modified = a.flatten()
print(a_modified)
a_modified = torch.flatten(a)
print(a_modified)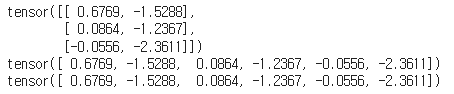
a = torch.randn(3,2,3)

a_modified = torch.flatten(a,0)
print(a_modified)

#(3,6)으로 Flatten
a_modified = torch.flatten(a,1)
print(a_modified)
print(a_modified.size())

#(6,3)으로 Flatten
a_modified = torch.flatten(a,0,1)
print(a_modified)
print(a_modified.size())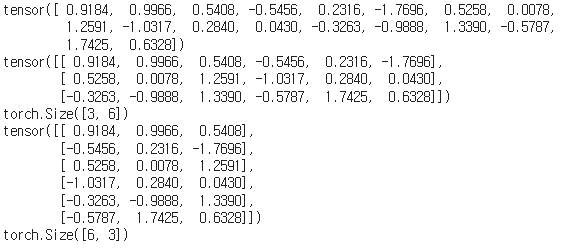
flatten(Tensor,a,b) => Tensor을 a번째 차원에서부터 b번째 차원까지 평탄화를 진행한다.
reshape()
a = torch.arange(20)
print(a)
print(a.size())

a= a.reshape(4,5)
print(a)

a= a.reshape(4,-1)
print(a)

a= a.reshape(-1,5)
print(a)

a= a.reshape(2,2,5)
print(a)

a= a.reshape(-1,2,5)
print(a)

a= a.reshape(2,-1,5)
print(a)

a= a.reshape(2,2,-1)
print(a)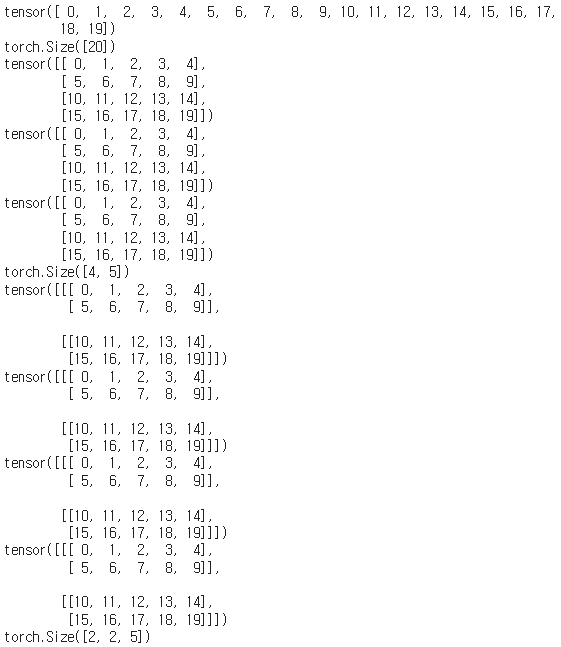
reshape() vs view()
reshape은 Tensor의 형태를 변경할 수 있으며, 연속적이지 않은 데이터에 대해서도 새로운 Tensor를 생성할 수 있다.
view는 Tensor의 형태를 변경하며, 원본 Tensor와 같은 연속적인 메모리 블록을 참조하는 새로운 Tensor를 생성다. 연속적인 메모리 블록이 필요하다.
transpose()
Tensor의 특정한 두 축을 바꾸는 Method이다.
a = torch.randn(3,4)
print('a = ', a)
print(a.shape)

a = a.transpose(0, 1)
print('a = ', a)
print(a.shape)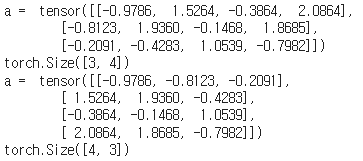
a = torch.randn(3,4,7)
print('a = ', a)
print(a.shape)

a = a.transpose(1, 2)
print('a = ', a)
print(a.shape)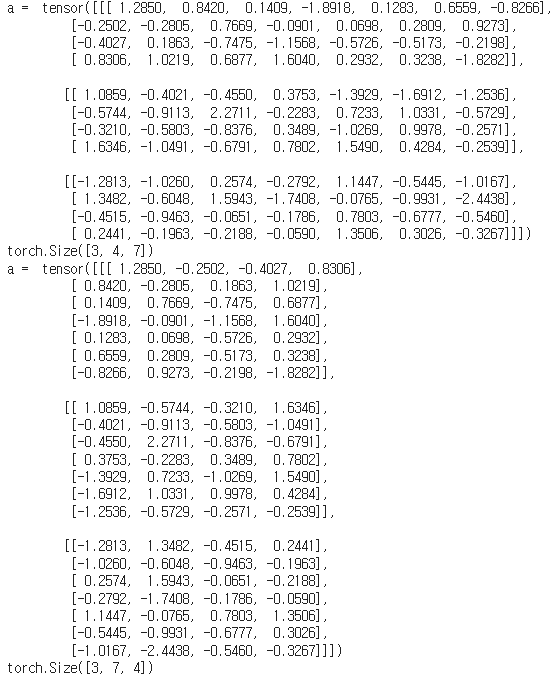
transpose(a,b) => a축과 b축을 바꾼다.
squeeze()
squeeze() 메서드는 Tensor의 차원 중 크기가 1인 차원을 제거하는 데 사용된다.
a = torch.tensor([[[[1, 2, 3, 4]],
                   [[5, 6, 7, 8]],
                   [[9, 10, 11, 12]]]])

print(a)
print(a.shape)
print('\n')

b = a.squeeze()
print(b)
print(b.shape)
print('\n')


c = a.squeeze(dim=0)
print(c)
print(c.shape)
print('\n')

d = a.squeeze(dim=2)
print(d)
print(d.shape)
print('\n')
unsqueeze()
"함수 시그니처"
torch.unsqueeze(input, dim)

# input: 차원을 추가할 원본 Tensor입니다.
# dim: 추가할 차원의 위치를 지정하는 정수입니다. 이 위치에 새로운 차원이 삽입됩니다.
"Method 시그니처"
Tensor.unsqueeze(dim)

# dim: 추가할 차원의 위치를 지정하는 정수입니다. 이 위치에 새로운 차원이 삽입됩니다.
unsqueeze(dim) 메서드는 Tensor의 지정된 위치 dim에 크기가 1인 새로운 차원을 추가한다.
a = torch.tensor([1, 2, 3, 4])

print(a)
print(a.shape)
print('\n')


b = a.unsqueeze(dim=0)
print(b)
print(b.shape)
print('\n')


c = a.unsqueeze(dim=1)
print(c)
print(c.shape)
print('\n')

d = a.unsqueeze(dim=0).unsqueeze(dim=0)
print(d)
print(d.shape)
print('\n')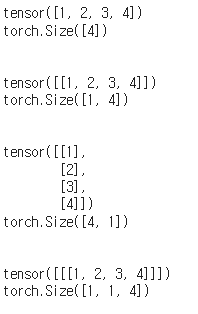
stack()
"함수 시그니처"
torch.stack(tensors, dim=0, out=None)

# tensors: Tensor들의 시퀀스(리스트 또는 튜플). 모든 Tensor는 동일한 크기와 차원을 가져야 합니다.
# dim: 새로 추가할 차원의 위치를 지정하는 정수. 기본값은 0입니다.
# out: 선택적 매개변수로, 결과를 저장할 Tensor입니다. 기본값은 None입니다.
stack() 함수는 여러 Tensor를 새로운 차원에 따라 쌓아 올려 하나의 Tensor로 만드는 함수이다.
red_channel = torch.tensor([[255, 0, 0], [255, 0, 0]], dtype=torch.uint8)
green_channel = torch.tensor([[0, 255, 0], [0, 255, 0]], dtype=torch.uint8)
blue_channel = torch.tensor([[0, 0, 255], [0, 0, 255]], dtype=torch.uint8)

print("Red Channel:")
print(red_channel)

print("\nGreen Channel:")
print(green_channel)

print("\nBlue Channel:")
print(blue_channel)

rgb_image = torch.stack([red_channel, green_channel, blue_channel], dim=0)

print("\nStacked RGB Image:")
print(rgb_image)
print("Shape of RGB Image:", rgb_image.shape)

rgb_image = torch.stack([red_channel, green_channel, blue_channel], dim=1)

print("\nStacked RGB Image:")
print(rgb_image)
print("Shape of RGB Image:", rgb_image.shape)

rgb_image = torch.stack([red_channel, green_channel, blue_channel], dim=2)

print("\nStacked RGB Image:")
print(rgb_image)
print("Shape of RGB Image:", rgb_image.shape)
cat()
"함수 시그니처"
torch.cat(tensors, dim=0, out=None)

# tensors: 연결할 Tensor들의 시퀀스(리스트 또는 튜플).
# dim: 연결할 차원(축). 기본값은 0.
# out: 결과를 저장할 선택적인 Tensor (기본값은 None)
cat() 함수는 여러 Tensor를 주어진 차원에 따라 연결(concatenate)하여 하나의 Tensor로 만드는 함수이다.
stack()과 다르게 차원을 추가하지 않는다.
a = torch.tensor([1, 2, 3])
b = torch.tensor([4, 5, 6])

# dim=0 (첫 번째 차원)으로 연결
result = torch.cat((a, b), dim=0)

print("Tensor 'a':")
print(a)
print("Tensor 'b':")
print(b)
print("Concatenated Tensor 'result':")
print(result)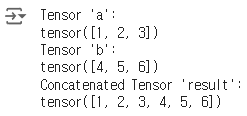
expand()
# Method 시그니처
Tensor.expand(*sizes)

# input: 크기를 확장할 원본 Tensor입니다.
# sizes: 확장할 목표 크기를 지정하는 정수 또는 정수 시퀀스입니다. 이 값들은 각 차원의 크기를 지정합니다.
expand() 는 PyTorch에서 Tensor의 크기를 확장하는 데 사용된다.
그러나 이 함수와 메서드는 unsqueeze와는 다르게, 기존 데이터를 복사하지 않고 Tensor의 view를 확장하여 새로운 차원에 대해 반복하는 방식으로 동작다.
a = torch.tensor([[1, 2, 3]])


# 차원을 확장하여 4x3 Tensor로 변경
b = a.expand(4, 3)

print("Tensor 'a':")
print(a)
print("Expanded Tensor 'b':")
print(b)
print("Shape of 'b':", b.shape)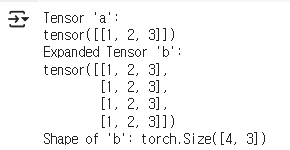
repeat()
Tensor.repeat(*sizes)

# sizes: 각 차원에서 반복할 횟수를 지정하는 정수 또는 정수 시퀀스입니다. 이 값들은 새로운 Tensor의 각 차원에서 몇 번 반복할지를 정의합니다
torch.repeat() 함수는 Tensor의 내용을 반복하여 새로운 Tensor를 생성하는 데 사용된다.
expand()와 달리 view를 확장하는것이 아니라 새로운 Tensor을 만들어낸다.
a = torch.tensor([[1, 2], [3, 4]])

b = a.repeat(2, 3, 2)

print("Tensor 'a':")
print(a)
print("Shape of 'a':", a.shape)
print("Repeated Tensor 'b':")
print(b)
print("Shape of 'b':", b.shape)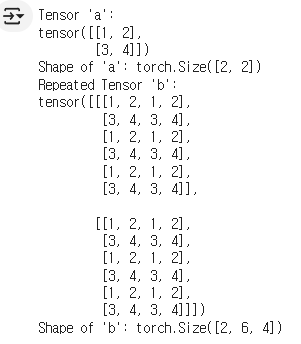
'AI Tech' 카테고리의 다른 글
| Linear Regression with Pytorch (0) | 2024.08.07 |
|---|---|
| What is Pytorch(행렬곱)? (0) | 2024.08.07 |
| What is Pytorch (유사도)? (0) | 2024.08.07 |
| What is Pytroch(Ln Norm)? (0) | 2024.08.06 |
| What is Pytroch (2)? (0) | 2024.08.06 |


